

How to make your NFT mint site (start to finish)


Table of contents
Tech stack
To build the NFT mint site, we'll need technologies to build our frontend and smart contracts. We then need to deploy the smart contracts onto Ethereum, and interact with them to perform actions (e.g. minting an NFT) and also get important information (e.g. how many NFTs are already minted).
Frontend
- Next.js — React framework
- Tailwind CSS — CSS framework
Smart contracts
- Hardhat — Solidity development environment/framework
- OpenZeppelin Contracts — Smart contract library for Ethereum and other blockchains
Ethereum
- Ethereum — The most popular general purpose blockchain
- Ethers.js — Javascript library to interact with the Ethereum blockchain and smart contracts
- Alchemy — Ethereum Node Provider (also provides other developement services)
Others
- Web3Modal — A single Web3/Ethereum provider solution for all wallets e.g. Metamask, Coinbase wallet, etc.
- dotenv — JavaScript module that allows easy access of environment variables from a
.envfile - yarn — Package manager like npm but with better performance and security
Disclaimer: Throughout this guide, I strongly encourage you to click onto any hyperlinks provided as they'll be helpful in helping you understand certain concepts and how certain packages work if you're just starting out as a developer.
Phase 1: Project setup
To start, let's get a visualisation of how the project structure will look like: 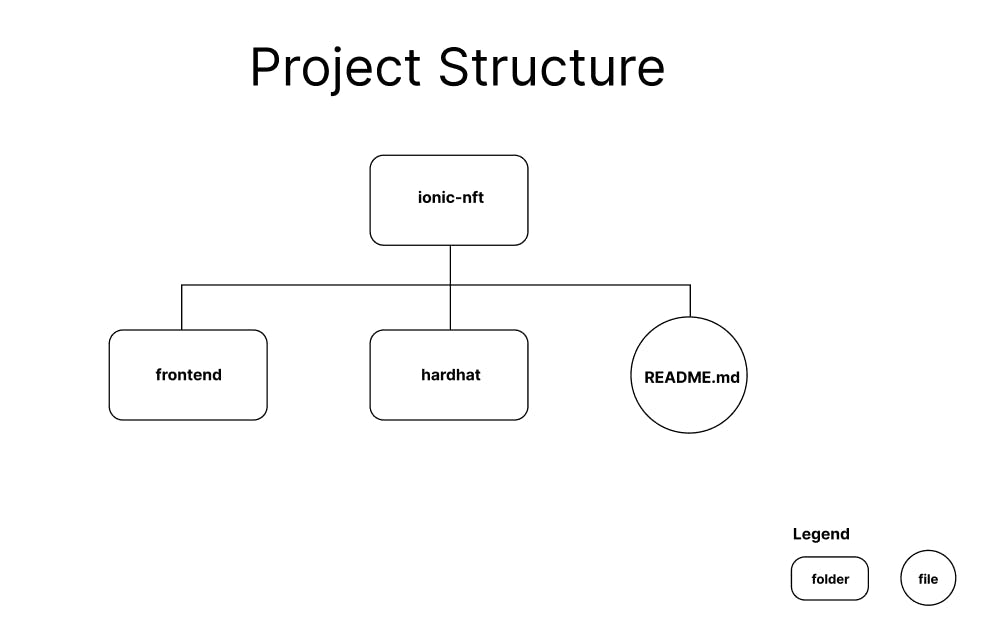
Steps
Open up your terminal and choose a directory that you want your project to be located in. Then, make a new folder called ionic-nft(you can name it whatever you want your NFT collection to be) and navigate into that folder by running these commands:
mkdir ionic-nft
cd ionic-nft
Create a Next.js frontend for our project:
npx create-next-app frontendSince
create-next-appinitialises git automatically for us, we'll have to unintialise it as we want to push our entire project together in the same git history. To do so, we navigate into our frontend directory and remove git from it:cd frontend rm -rf .gitThis is an important step as not doing so will create a git dispute when you initialise git separately in your root directory(ionic-nft). Next, remove the package-lock.json file and node_modules. Reinstall dependencies using the command:
yarnWe can then test if our project works by running:
yarn devIf everything works, you should see something like this:
 With that, you're all set for the frontend setup!
Create a HardHat project for our NFT project:
mkdir hardhat // creates a new directory for your HardHat project
cd hardhat
Now, we will do the initialisation of the HardHat framework/environment inside our directory:
npx hardhatThere will be a prompt to install the
hardhatpackage. Click enter to confirm. It should look something like this after installation: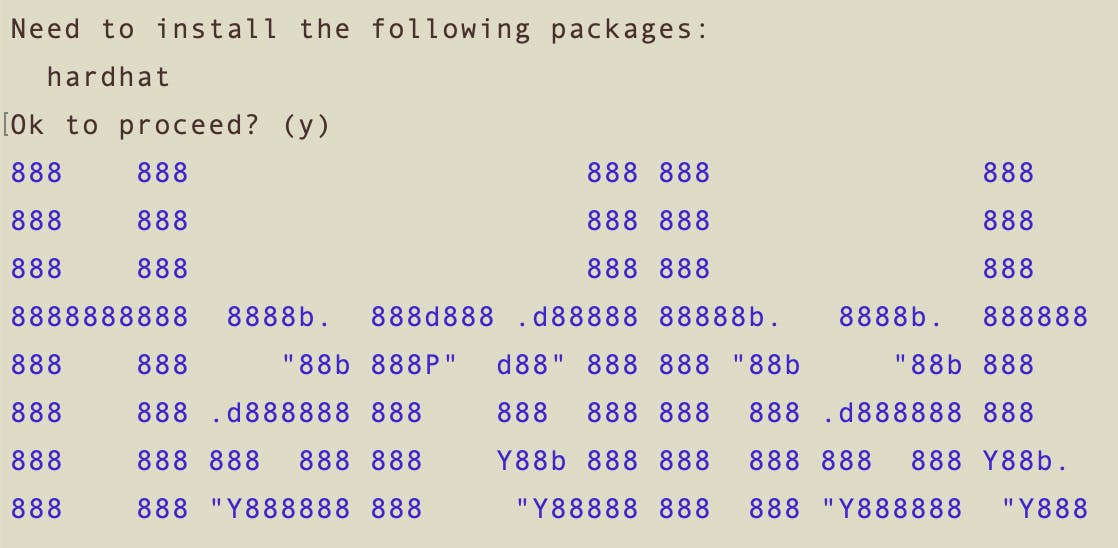 Next, there'll be a few more prompts that'll look something like this:
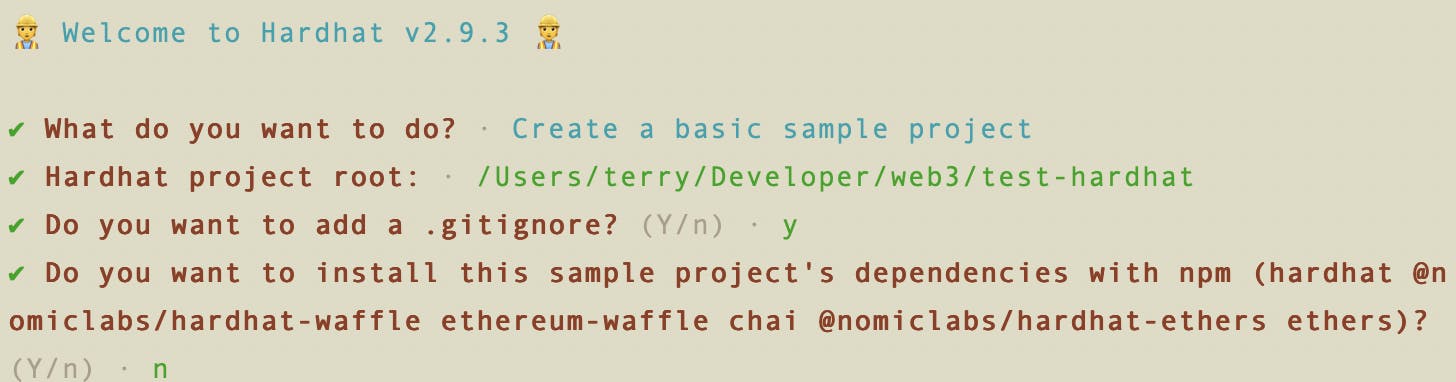 Follow the options selected as per the image above.
There are a total of 5 prompts as you can see, so let's break them down one by one:
1.Choosing the type of project you want to create.
2.Choosing the directory where you want to initialise your hardhat project in.
3.Adding a gitignore.
4.HardHat helping you install dependencies with npm (we don't allow this because we'll be primarily using yarn in this project).
5.You might also see an additional prompt: Sharing analytics and reports with HardHat(you see this almost everyday when installing new apps on your devices).
Follow the options selected as per the image above.
There are a total of 5 prompts as you can see, so let's break them down one by one:
1.Choosing the type of project you want to create.
2.Choosing the directory where you want to initialise your hardhat project in.
3.Adding a gitignore.
4.HardHat helping you install dependencies with npm (we don't allow this because we'll be primarily using yarn in this project).
5.You might also see an additional prompt: Sharing analytics and reports with HardHat(you see this almost everyday when installing new apps on your devices).
Phase 2: Building our smart contracts
To build our smart contracts, we'll be using HardHat which we have installed earlier in the project setup. HardHat is a full stack Ethereum development environment and framework that allows us to:
- Write contracts
- Test contracts/debugging
- Deploy contracts
To start off, install the dependencies we need by running:
cd hardhat
yarn add --dev hardhat @nomiclabs/hardhat-waffle ethereum-waffle chai @nomiclabs/hardhat-ethers ethers
yarn add @openzeppelin/contracts
yarn add --dev is basically the yarn equivalent of npm i --save-dev
Notice how there is a use of --dev. This implies that we're installing these packages as dev-dependencies instead of regular dependencies. With that, we're done setting up our HardHat project.
For more info regarding the dependencies:
hardhat- to initialise an evironment and tools for us to build/debug/test/deploy our contracts@nomiclabs/hardhat-waffle- a HardHat-ready version of waffle that we can use in the Hardhat Runtime Environment(HRE) test our contractsethereum-waffle- framework to test smart contractschai- assertion library that provides plenty of assertion methods, making testing easier@nomiclabs/hardhat-ethers- provides us a HardHat-ready version of ethers.js that we can use in our HREethers- JS library for connecting the frontend to the Ethereum blockchain and interacting with smart contracts@openzeppelin/contracts- smart contract library that provides us withOwnable.solandERC721Enumerable.solthat we need for our NFT project
Now let's take a look at our initial hardhat file structure:
contracts/  // contains the source files of your contracts
node_modules/ // contains the modules/libraries that you'll be using(by importing) in your project
scripts/ // contains simple automation scripts
test/ // contains test files for the project
.gitignore // file tells Git which files to ignore when committing your project to the GitHub repository
hardhat.config.js // configuration setup file for the HardHat project. when HardHat is run, it searches for this file for its configuration
package.json // see link below
README.md // a type of text file that contains description and information about the project
yarn.lock // see link below
Extra info:
- scripts.
- [package.json](heynode.com/tutorial/what-packagejson/#:~:t...
- yarn.lock
The first building block of our NFT project would be to include a whitelist contract that whitelists all our early participants.
Create a new file named IWhitelist.sol under hardhat/contracts/.
Write the following code:
// SPDX-License-Identifier: MIT
pragma solidity ^0.8.4;

interface IWhitelist {
    function whitelistedAddresses(address) external view returns (bool);
}
What we're doing here is creating an interface for the Whitelist contract to use one of its methods in our NFT contract, hence the "I" in front of the file name. Doing this helps us save gas as every operation on Ethereum requires an amount of gas to execute.
Next, we write our NFT contract for our Ionic NFTs. Create a new file named IonicNFT.sol under hardhat/contracts/. Write the following code (explanation included as comments):
// SPDX-License-Identifier: MIT
pragma solidity ^0.8.4;

import "@openzeppelin/contracts/token/ERC721/extensions/ERC721Enumerable.sol";
import "@openzeppelin/contracts/access/Ownable.sol";
import "./IWhitelist.sol";

contract IonicNFT is ERC721Enumerable, Ownable {
    /**
     * @dev _baseTokenURI for computing {tokenURI}. If set, the resulting URI for each
     * token will be the concatenation of the `baseURI` and the `tokenId`.
     */
    string _baseTokenURI;

    //  _price is the price of one Ionic NFT during presale
    uint256 public _presalePrice = 0.01 ether;

    //  _price is the price of one Ionic NFT during public sale
    uint256 public _publicPrice = 0.03 ether;

    // _paused is used to pause the contract in case of an emergency
    bool public _paused;

    // max number of Ionic NFT
    uint256 public maxTokenIds = 5;

    // total number of tokenIds minted
    uint256 public tokenIds;

    // Whitelist contract instance
    IWhitelist whitelist;

    // boolean to keep track of whether presale started or not
    bool public presaleStarted;

    // timestamp for when presale would end
    uint256 public presaleEnded;

    // A modifier is just some code that runs before and/or after a function call
    // They are commonly used to restrict access to certain functions, validate iniput parameters,
    // protect against certain forms of attacks, etc.
    modifier onlyWhenNotPaused() {
        require(!_paused, "Contract currently paused");
        _; // the function body of the function using this modifer is inserted here e.g. presaleMint() below
    }

    /**
     * @dev ERC721 constructor takes in a `name` and a `symbol` to the token collection.
     * name in our case is `Ionic Elements` and symbol is `IE`.
     * Constructor for Ionic Elements takes in the baseURI (root URL of website domain api in our case) to set _baseTokenURI for the collection.
     * It also initializes an instance of whitelist interface.
     */
    // A constructor is an optional function that is executed when a contract is first deployed
    constructor(string memory baseURI, address whitelistContract)
        ERC721("Ionic Elements", "IE")
    {
        _baseTokenURI = baseURI;
        whitelist = IWhitelist(whitelistContract);
    }

    /**
     * @dev startPresale starts a presale for the whitelisted addresses
     */
    // onlyOwner is a modifier inherited from the Ownable.sol contract from OpenZeppelin
    // block.timestamp is the timestamp of the current Ethereum block in seconds (unit)
    function startPresale() public onlyOwner {
        presaleStarted = true;
        // Set presaleEnded time as current timestamp + 5 minutes
        // Solidity has cool syntax for timestamps (seconds, minutes, hours, days, years)
        presaleEnded = block.timestamp + 5 minutes;
    }

    /**
     * @dev presaleMint allows a user to mint one NFT per transaction during the presale.
     */
    function presaleMint() public payable onlyWhenNotPaused {
        require(
            presaleStarted && block.timestamp < presaleEnded,
            "Presale is not running"
        );
        require(
            whitelist.whitelistedAddresses(msg.sender),
            "You are not whitelisted"
        );
        require(tokenIds < maxTokenIds, "Exceeded maximum Ionic NFT supply");
        require(msg.value >= _presalePrice, "Ether amount sent is not correct");
        tokenIds += 1;

        // _safeMint(ERC721 function) is a safer version of the _mint function as it ensures that
        // if the address being minted to is a contract, it is able receive/deal with ERC721 tokens, otherwise transfer is reverted
        // If the address being minted to is not a contract, it works the same way as _mint
        _safeMint(msg.sender, tokenIds);
    }

    /**
     * @dev mint allows a user to mint 1 NFT per transaction after the presale has ended.
     */
    function mint() public payable onlyWhenNotPaused {
        require(
            presaleStarted && block.timestamp >= presaleEnded,
            "Presale has not ended yet"
        );
        require(tokenIds < maxTokenIds, "Exceed maximum Ionic NFT supply");
        require(msg.value >= _publicPrice, "Ether amount sent is not correct");
        tokenIds += 1;

        _safeMint(msg.sender, tokenIds);
    }

    /**
     * @dev _baseURI overides the Openzeppelin's ERC721 implementation which by default
     * returned an empty string for the baseURI
     */
    function _baseURI() internal view virtual override returns (string memory) {
        return _baseTokenURI;
    }

    /**
     * @dev setPaused makes the contract paused or unpaused
     */
    function setPaused(bool val) public onlyOwner {
        _paused = val;
    }

    /**
     * @dev withdraw sends all the ether in the contract
     * to the owner of the contract
     */
    function withdraw() public onlyOwner {
        address _owner = owner();
        uint256 amount = address(this).balance;
        (bool sent, ) = _owner.call{value: amount}("");
        require(sent, "Failed to send Ether");
    }

    // Function to receive Ether. if msg.data is empty, this function is called
    receive() external payable {}

    // Fallback function to receive Ether. If msg.data is not empty, this function is called instead.
    fallback() external payable {}
}
Now, we'll have to install an additional package called dotenv to help us import environment variables. We do this instead of just writing our credentials e.g. private key in our code due to security reasons.
Run this command to install dotenv:
yarn add dotenv
In order to import an environment variable, they must exist first. Go ahead a create a .env file in the hardhat/ directory. After that, add the following code to the file:
// Go to https://www.alchemyapi.io, sign up, create
// a new App in its dashboard and select the network as Rinkeby, and replace "add-the-alchemy-key-url-here" with its key url
ALCHEMY_API_KEY_URL="add-the-alchemy-key-url-here"

// Replace the "add-the-private-key-here" with your account private key
// I would strongly recommend you to create a separate burner Metamask wallet
// or account separate from your main account containing mainnet ERC tokens
// To export your private key from Metamask, open Metamask and
// go to Account Details > Export Private Key
// Be aware of NEVER putting real Ether into testing accounts
ETH_PRIVATE_KEY="add-the-eth-private-key-here"
We need these variables in order to deploy our NFT contract to the Rinkeby Network (Ethereum Testnet).
We will also need the address of our whitelist contract and the URL to extract our metadata. For this, create a constants folder in hardhat/ and then create a file called index.js. In there, write the following code:
// Address of the Whitelist Contract
const WHITELIST_CONTRACT_ADDRESS = "0x4291Ed1d1d4fb74A98C30b1AD9a7FD9aE0195c51";

// Base URL to extract Metadata for a Ionic NFT
// Owning an NFT is owning a token on a blockchain.
// That token contains some metadata stored by this metadata URl that points to the JPG/PNG/etc.
const METADATA_URL = "https://nft-collection-sneh1999.vercel.app/api/";

// Exporting the constants
module.exports = { WHITELIST_CONTRACT_ADDRESS, METADATA_URL };
Use those constants provided first since you probably have not build a Whitelist contract and don't have a metadata URL until you build your frontend. No worries though. You will be replacing them with your own contract and URL in the future.
We name these variables as constants as they are variables that would not change in our project. They are also not environment variables as they are not authentication or API/backend information.
With our constants ready, let's now write some code to deploy the contract!
But wait. Before that, we'll need an additional package called dotenv. This package helps us load environment variables into a process.envvariable for easy access.
Next, in hardhat/scripts, create a file named deploy.js. Add the following code (explanation included as comments):
const { ethers } = require("hardhat");
require("dotenv").config({ path: ".env" }); // use of "path": specifying a custom path containing your environment variables
const { WHITELIST_CONTRACT_ADDRESS, METADATA_URL } = require("../constants");

async function main() {
  // Address of the whitelist contract that you deployed in the previous module
  const whitelistContract = WHITELIST_CONTRACT_ADDRESS;

  // URL from where we can extract the metadata for a Ionic NFT
  const metadataURL = METADATA_URL;

  /*
   * A ContractFactory in ethers.js is an abstraction used to deploy new smart contracts,
   * so "ionicNFTsContract" here is a factory for instances of our IonicNFT contract.
   * Think of it like a class, creating object instances. Car class creates car instances.
   */
  const ionicNFTContract = await ethers.getContractFactory("IonicNFT");

  // deploy the contract
  const deployedIonicNFTContract = await ionicNFTContract.deploy(
    metadataURL,
    whitelistContract
  );

  // print the address of the deployed contract
  console.log("Ionic NFT Contract Address:", deployedIonicNFTContract.address);
}

// Call the main function and catch if there is any error
main()
  .then(() => process.exit(0))
  .catch((error) => {
    console.error(error);
    process.exit(1);
  });
Now, last step before we actually run the deploy.js script to deploy our contract. We have to first specify the network we want to deploy to. For this guide, we will be deploying our contract to the Rinkeby network as you would've guessed when we setup our Alchemy project earlier. To specify the network, we do it in a configuration file called hardhat.config.js. In the file, add the following code:
require("@nomiclabs/hardhat-waffle");
require("dotenv").config({ path: ".env" });

const ALCHEMY_API_KEY_URL = process.env.ALCHEMY_API_KEY_URL;

const ETH_PRIVATE_KEY = process.env.ETH_PRIVATE_KEY;

module.exports = {
  solidity: "0.8.4", // solidity version
  networks: {
    rinkeby: {
      url: ALCHEMY_API_KEY_URL,
      accounts: [ETH_PRIVATE_KEY],
    },
  },
};
Now, let compile our contract that is written in Solidity. Make sure that you are in the hardhat/ directory and then run this command:
npx hardhat compile
If it is successful, you should see a success message

To test deployment, run the following command:
npx hardhat run scripts/deploy.js
Hardhat itself provides a local Ethereum network node designed for development. By running the above command, we deploy our NFT contract to the local node. This is an optional step, of course.
You'll get a printed message of your contract address if the deployment is successful:

For the actual contract deployment to the Rinkeby network, run the following command:
npx hardhat run scripts/deploy.js --network rinkeby
You should also get your NFT contract address if the deployment is successful. Save the address down somewhere. You will need it later.
With that, you're done writing and deploying the NFT contract to the Ethereum blockchain! Woohoo 🥳
In the next section, we'll be building the frontend for users to interact with our NFT contract in order to mint Ionic NFTs.
Phase 3: Building our frontend website
We'll be using Next.js for to build our frontend. Next.js is one of the best React.js Framework which provides out-of-the-box solutions for Routing, Image optimisation and static-site generation/server-side rendering.
To kick everything off, we have to first install a few dependencies. Make sure you're in your frontend/ directory, then:
yarn add web3modal ethers
In public/, create a ionic-nft/ folder. Then download all the image assets in github.com/t3reetan/ionic-nft/tree/main/fro... These images will be what we're minting into NFTs in this project. Basically what happens is the creation of a token on the Rinkeby network that fetches metadata which corresponds to these images.
To style our website we are going to be using tailwindcss later. Follow the instructions over here to setup it up first.
Now let's build our frontend. Add the following code in frontend/pages/index.js:
import { Contract, providers, utils } from "ethers";
import Head from "next/head";
import React, { useEffect, useRef, useState } from "react";
import Web3Modal from "web3modal";
import { abi, NFT_CONTRACT_ADDRESS } from "../constants";
import ionicNFTImg from "../public/ionic-nft/2.png";
import Image from "next/image";
export default function Home() {
// walletConnected keep track of whether the user's wallet is connected or not
const [walletConnected, setWalletConnected] = useState(false);
// presaleStarted keeps track of whether the presale has started or not
const [presaleStarted, setPresaleStarted] = useState(false);
// presaleEnded keeps track of whether the presale ended
const [presaleEnded, setPresaleEnded] = useState(false);
// loading is set to true when we are waiting for a transaction to get mined
const [loading, setLoading] = useState(false);
// checks if the currently connected MetaMask wallet is the owner of the contract
const [isOwner, setIsOwner] = useState(false);
// tokenIdsMinted keeps track of the number of tokenIds that have been minted
const [tokenIdsMinted, setTokenIdsMinted] = useState("0");
// Create a reference to the Web3 Modal (used for connecting to Metamask) which persists as long as the page is open
const web3ModalRef = useRef();
// useEffects are used to react to changes in state of the website
// The array at the end of function call represents what state changes will trigger this effect
// In this case, whenever the value of `walletConnected` changes - this effect will be called
useEffect(() => {
// if wallet is not connected, create a new instance of Web3Modal and connect the MetaMask wallet
if (!walletConnected) {
// Assign the Web3Modal class to the reference object by setting it's `current` value
// The `current` value is persisted throughout as long as this page is open
web3ModalRef.current = new Web3Modal({
network: "rinkeby",
providerOptions: {},
disableInjectedProvider: false,
});
connectWallet();
// Check if presale has started and ended
const _presaleStarted = checkIfPresaleStarted();
if (_presaleStarted) {
checkIfPresaleEnded();
}
getTokenIdsMinted();
// Set an interval which gets called every 5 seconds to check presale has ended
const presaleEndedInterval = setInterval(async function () {
const _presaleStarted = await checkIfPresaleStarted();
if (_presaleStarted) {
const _presaleEnded = await checkIfPresaleEnded();
if (_presaleEnded) {
clearInterval(presaleEndedInterval);
}
}
}, 5 * 1000);
// set an interval to get the number of token Ids minted every 3 seconds
setInterval(async function () {
await getTokenIdsMinted();
}, 3 * 1000);
}
}, [walletConnected]);
/*
connectWallet: Connects the MetaMask wallet
*/
const connectWallet = async () => {
try {
// Get the provider from web3Modal, which in our case is MetaMask
// When used for the first time, it prompts the user to connect their wallet
// #1: get access to the user's provider (metamask)
await getProviderOrSigner();
// #2: update walletConnected state to be true
setWalletConnected(true);
} catch (err) {
console.error(err);
}
};
/**
* Returns a Provider or Signer object representing the Ethereum RPC with or without the
* signing capabilities of metamask attached
*
* A `Provider` is needed to interact with the blockchain - reading transactions, reading balances, reading state, etc.
*
* A `Signer` is a special type of Provider used in case a `write` transaction needs to be made to the blockchain, which involves the connected account
* needing to make a digital signature to authorize the transaction being sent. Metamask exposes a Signer API to allow your website to
* request signatures from the user using Signer functions.
*
* @param {*} needSigner - True if you need the signer, default false otherwise
*/
const getProviderOrSigner = async (needSigner = false) => {
// Connect to Metamask
// Since we store `web3Modal` as a reference, we need to access the `current` value to get access to the underlying object
const provider = await web3ModalRef.current.connect();
const web3Provider = new providers.Web3Provider(provider);
// If user is not connected to the Rinkeby network, let them know and throw an error
const { chainId } = await web3Provider.getNetwork();
if (chainId !== 4) {
window.alert("Change the network to Rinkeby");
throw new Error("Change network to Rinkeby");
}
if (needSigner) {
const signer = web3Provider.getSigner();
return signer;
}
return web3Provider;
};
/**
* presaleMint: Mint an Ionic NFT during the presale
*/
const presaleMint = async () => {
try {
// We need a Signer here since this is a 'write' transaction.
const signer = await getProviderOrSigner(true);
// Create a new instance of the Contract with a Signer, which allows
// update methods
const whitelistContract = new Contract(NFT_CONTRACT_ADDRESS, abi, signer);
// call the presaleMint from the contract, only whitelisted addresses would be able to mint
const tx = await whitelistContract.presaleMint({
// "value" signifies the cost of one Ionic NFT which is "0.01" eth
// presaleMint function in our contract requires us to send 0.01 ether for a presale mint
// We are parsing `0.01` string to ether using the utils library from ethers.js
value: utils.parseEther("0.01"),
});
setLoading(true);
// wait for the transaction to get mined
await tx.wait();
setLoading(false);
window.alert("You successfully minted an Ionic Element!");
} catch (err) {
console.error(err);
}
};
/**
* publicMint: Mint an NFT after the presale
*/
const publicMint = async () => {
try {
// We need a Signer here since this is a 'write' transaction.
const signer = await getProviderOrSigner(true);
// Create a new instance of the Contract with a Signer, which allows
// update methods
const whitelistContract = new Contract(NFT_CONTRACT_ADDRESS, abi, signer);
// call the mint from the contract to mint an Ionic NFT
const tx = await whitelistContract.mint({
// value signifies the cost of one Ionic NFT which is "0.01" eth.
// We are parsing `0.01` string to ether using the utils library from ethers.js
value: utils.parseEther("0.01"),
});
setLoading(true);
// wait for the transaction to get mined
await tx.wait();
setLoading(false);
window.alert("You successfully minted an Ionic Element!");
} catch (err) {
console.error(err);
}
};
/**
* startPresale: starts the presale for the NFT Collection
*/
const startPresale = async () => {
try {
// We need a Signer here since this is a 'write' transaction.
const signer = await getProviderOrSigner(true);
// Create a new instance of the Contract with a Signer, which allows
// update methods
const whitelistContract = new Contract(NFT_CONTRACT_ADDRESS, abi, signer);
// call the startPresale from the contract
const tx = await whitelistContract.startPresale();
setLoading(true);
// wait for the transaction to get mined
await tx.wait();
setLoading(false);
// set the presale started to true
await checkIfPresaleStarted();
} catch (err) {
console.error(err);
}
};
/**
* checkIfPresaleStarted: checks if the presale has started by quering the `presaleStarted`
* variable in the contract
*/
const checkIfPresaleStarted = async () => {
try {
// Get the provider from web3Modal, which in our case is MetaMask
// No need for the Signer here, as we are only reading state from the blockchain
const provider = await getProviderOrSigner();
// We connect to the Contract using a Provider, so we will only
// have read-only access to the Contract
const nftContract = new Contract(NFT_CONTRACT_ADDRESS, abi, provider);
// call the presaleStarted from the contract
const _presaleStarted = await nftContract.presaleStarted();
if (!_presaleStarted) {
await getOwner();
}
setPresaleStarted(_presaleStarted);
return _presaleStarted;
} catch (err) {
console.error(err);
return false;
}
};
/**
* checkIfPresaleEnded: checks if the presale has ended by quering the `presaleEnded`
* variable in the contract
*/
const checkIfPresaleEnded = async () => {
try {
// Get the provider from web3Modal, which in our case is MetaMask
// No need for the Signer here, as we are only reading state from the blockchain
const provider = await getProviderOrSigner();
// We connect to the Contract using a Provider, so we will only
// have read-only access to the Contract
const nftContract = new Contract(NFT_CONTRACT_ADDRESS, abi, provider);
// call the presaleEnded from the contract
const _presaleEnded = await nftContract.presaleEnded();
// _presaleEnded is a Big Number, so we are using the lt(less than function) instead of `<`
// Date.now()/1000 returns the current time in seconds
// We compare if the _presaleEnded timestamp is less than the current time
// which means presale has ended
const hasEnded = _presaleEnded.lt(Math.floor(Date.now() / 1000));
if (hasEnded) {
setPresaleEnded(true);
} else {
setPresaleEnded(false);
}
return hasEnded;
} catch (err) {
console.error(err);
return false;
}
};
/**
* getOwner: calls the contract to retrieve the owner
*/
const getOwner = async () => {
try {
// Get the provider from web3Modal, which in our case is MetaMask
// No need for the Signer here, as we are only reading state from the blockchain
const provider = await getProviderOrSigner();
// We connect to the Contract using a Provider, so we will only
// have read-only access to the Contract
const nftContract = new Contract(NFT_CONTRACT_ADDRESS, abi, provider);
// call the owner function from the contract
const _owner = await nftContract.owner();
// We will get the signer now to extract the address of the currently connected MetaMask account
const signer = await getProviderOrSigner(true);
// Get the address associated to the signer which is connected to MetaMask
const address = await signer.getAddress();
if (address.toLowerCase() === _owner.toLowerCase()) {
setIsOwner(true);
}
} catch (err) {
console.error(err.message);
}
};
/**
* getTokenIdsMinted: gets the number of tokenIds that have been minted
*/
const getTokenIdsMinted = async () => {
try {
// Get the provider from web3Modal, which in our case is MetaMask
// No need for the Signer here, as we are only reading state from the blockchain
const provider = await getProviderOrSigner();
// We connect to the Contract using a Provider, so we will only
// have read-only access to the Contract
const nftContract = new Contract(NFT_CONTRACT_ADDRESS, abi, provider);
// call the tokenIds from the contract
const _tokenIds = await nftContract.tokenIds();
//_tokenIds is a `Big Number`. We need to convert the Big Number to a string
setTokenIdsMinted(_tokenIds.toString());
} catch (err) {
console.error(err);
}
};
/*
renderButton: Returns a button based on the state of the dapp
*/
const renderButton = () => {
// If wallet is not connected, return a button which allows them to connect their wllet
if (!walletConnected) {
return (
<button
className="w-52 h-12 border-[.15rem] border-teal-500 rounded-xl text-teal-600
font-bold hover:bg-teal-500 hover:text-white transition-all duration-300"
onClick={connectWallet}
>
Connect your wallet
</button>
);
}
// If we are currently waiting for something, return a loading button
if (loading) {
return (
<div className="text-xl text-stone-500 font-bold border border-stone-500 p-2 inline cursor-wait">
Loading...
</div>
);
}
// If connected user is the owner, and presale hasnt started yet, allow them to start the presale
if (isOwner && !presaleStarted) {
return (
<button
className="w-52 h-12 border-[.15rem] border-pink-500 rounded-xl text-pink-600
font-bold hover:bg-pink-500 hover:text-white transition-all duration-300"
onClick={startPresale}
>
Start Presale!
</button>
);
}
// If connected user is not the owner but presale hasn't started yet, tell them that
if (!presaleStarted) {
return (
<div>
<div className="text-xl text-yellow-500 font-bold border border-yellow-500 p-2 inline cursor-not-allowed">
Presale hasnt started!
</div>
</div>
);
}
// If presale started, but hasn't ended yet, allow for minting during the presale period
if (presaleStarted && !presaleEnded) {
return (
<div>
<div>
Presale has started!!! If your address is whitelisted, Mint an Ionic
Element 🥳
</div>
<button
className="w-52 h-12 border-[.15rem] border-purple-500 rounded-xl text-purple-600
font-bold hover:bg-purple-500 hover:text-white transition-all duration-300"
onClick={presaleMint}
>
Presale Mint 🚀
</button>
</div>
);
}
// If presale started and has ended, its time for public minting
if (presaleStarted && presaleEnded) {
return (
<button
className="w-52 h-12 border-[.15rem] border-blue-500 rounded-xl text-blue-600
font-bold hover:bg-blue-500 hover:text-white transition-all duration-300"
onClick={publicMint}
>
Public Mint 🚀
</button>
);
}
};
return (
<div>
<Head>
<title>Ionic NFTs</title>
<meta name="description" content="Ionic NFTs dApp" />
<link rel="icon" href="/favicon.ico" />
</Head>
<div className="flex flex-row justify-center items-center min-h-[90vh]">
<div>
<h1 className="text-5xl my-8">Welcome to the Ionic Elements!</h1>
<div className="text-xl my-8">
A 5x Unique Ionic Elemental NFTs collection
</div>
<div className="text-xl my-8">
{tokenIdsMinted}/5 have been minted
</div>
{renderButton()}
</div>
<div className="ml-[10%]">
<Image
className="rounded-md"
src={ionicNFTImg}
width={500}
height={400}
/>
</div>
</div>
<footer className="flex px-8 justify-center items-center border-t border-slate-200 pt-8">
Made with ❤ by the cryptorookie.io team
</footer>
</div>
);
}
Do read the explanations attached as comments to better understand what each line is doing. You notice how there is an import statement of import { abi, NFT_CONTRACT_ADDRESS } from "../constants";. Those are data that we need from our NFT contract that we deployed in the previous phase.
Create a constants/ folder in frontend/, then create an index.js file. Add the following code:
// Navigate to hardhat/artifacts/contracts/IonicNFT.sol/IonicNFT.json
// Copy the entire abi array and replace the ---your abi--- field below
export const abi =---your abi---
// Paste the NFT contract address that you saved when you previously deployed the contract
export const NFT_CONTRACT_ADDRESS = "address of your NFT contract"
Those classnames that you see like text-xl and my-8 are tailwindcss utility classes. They are plug-and-play classes that we can use to style elements without having to write any css.
With that, everything should work now! Run yarn dev to boot up your local dev server. You'll see that a basic website with our implemented functionalities of connecting a wallet, minting an NFT, telling us how many NFTs are minted, etc.
Phase 4: Github and App deployment
Now that we're done writing all the code, we push the project onto github. Remember to push the entire ionic-nft folder, not just the frontend or hardhat holder.
Next, we'll deploy the app so that it can be used by the public. For this, we'll be using Vercel. We're using Vercel as it integrates Next.js seamlessly since Vercel were the ones that created the Next.js framework. They sort of belong to the same "ecosystem".
To deploy the app using Vercel, follow these steps:
- Go to vercel.com and sign in with your GitHub
- Click on New Project
- Import the ionic-nft git repository
- Under the ROOT DIRECTORY field, click edit and select frontend. This is because even though the project is made up of both frontend and written smart contracts, we're only deploying the frontend to production since it's what the user will be directly interfacing with.
- Under FRAMEWORK PRESET, select Next.js.
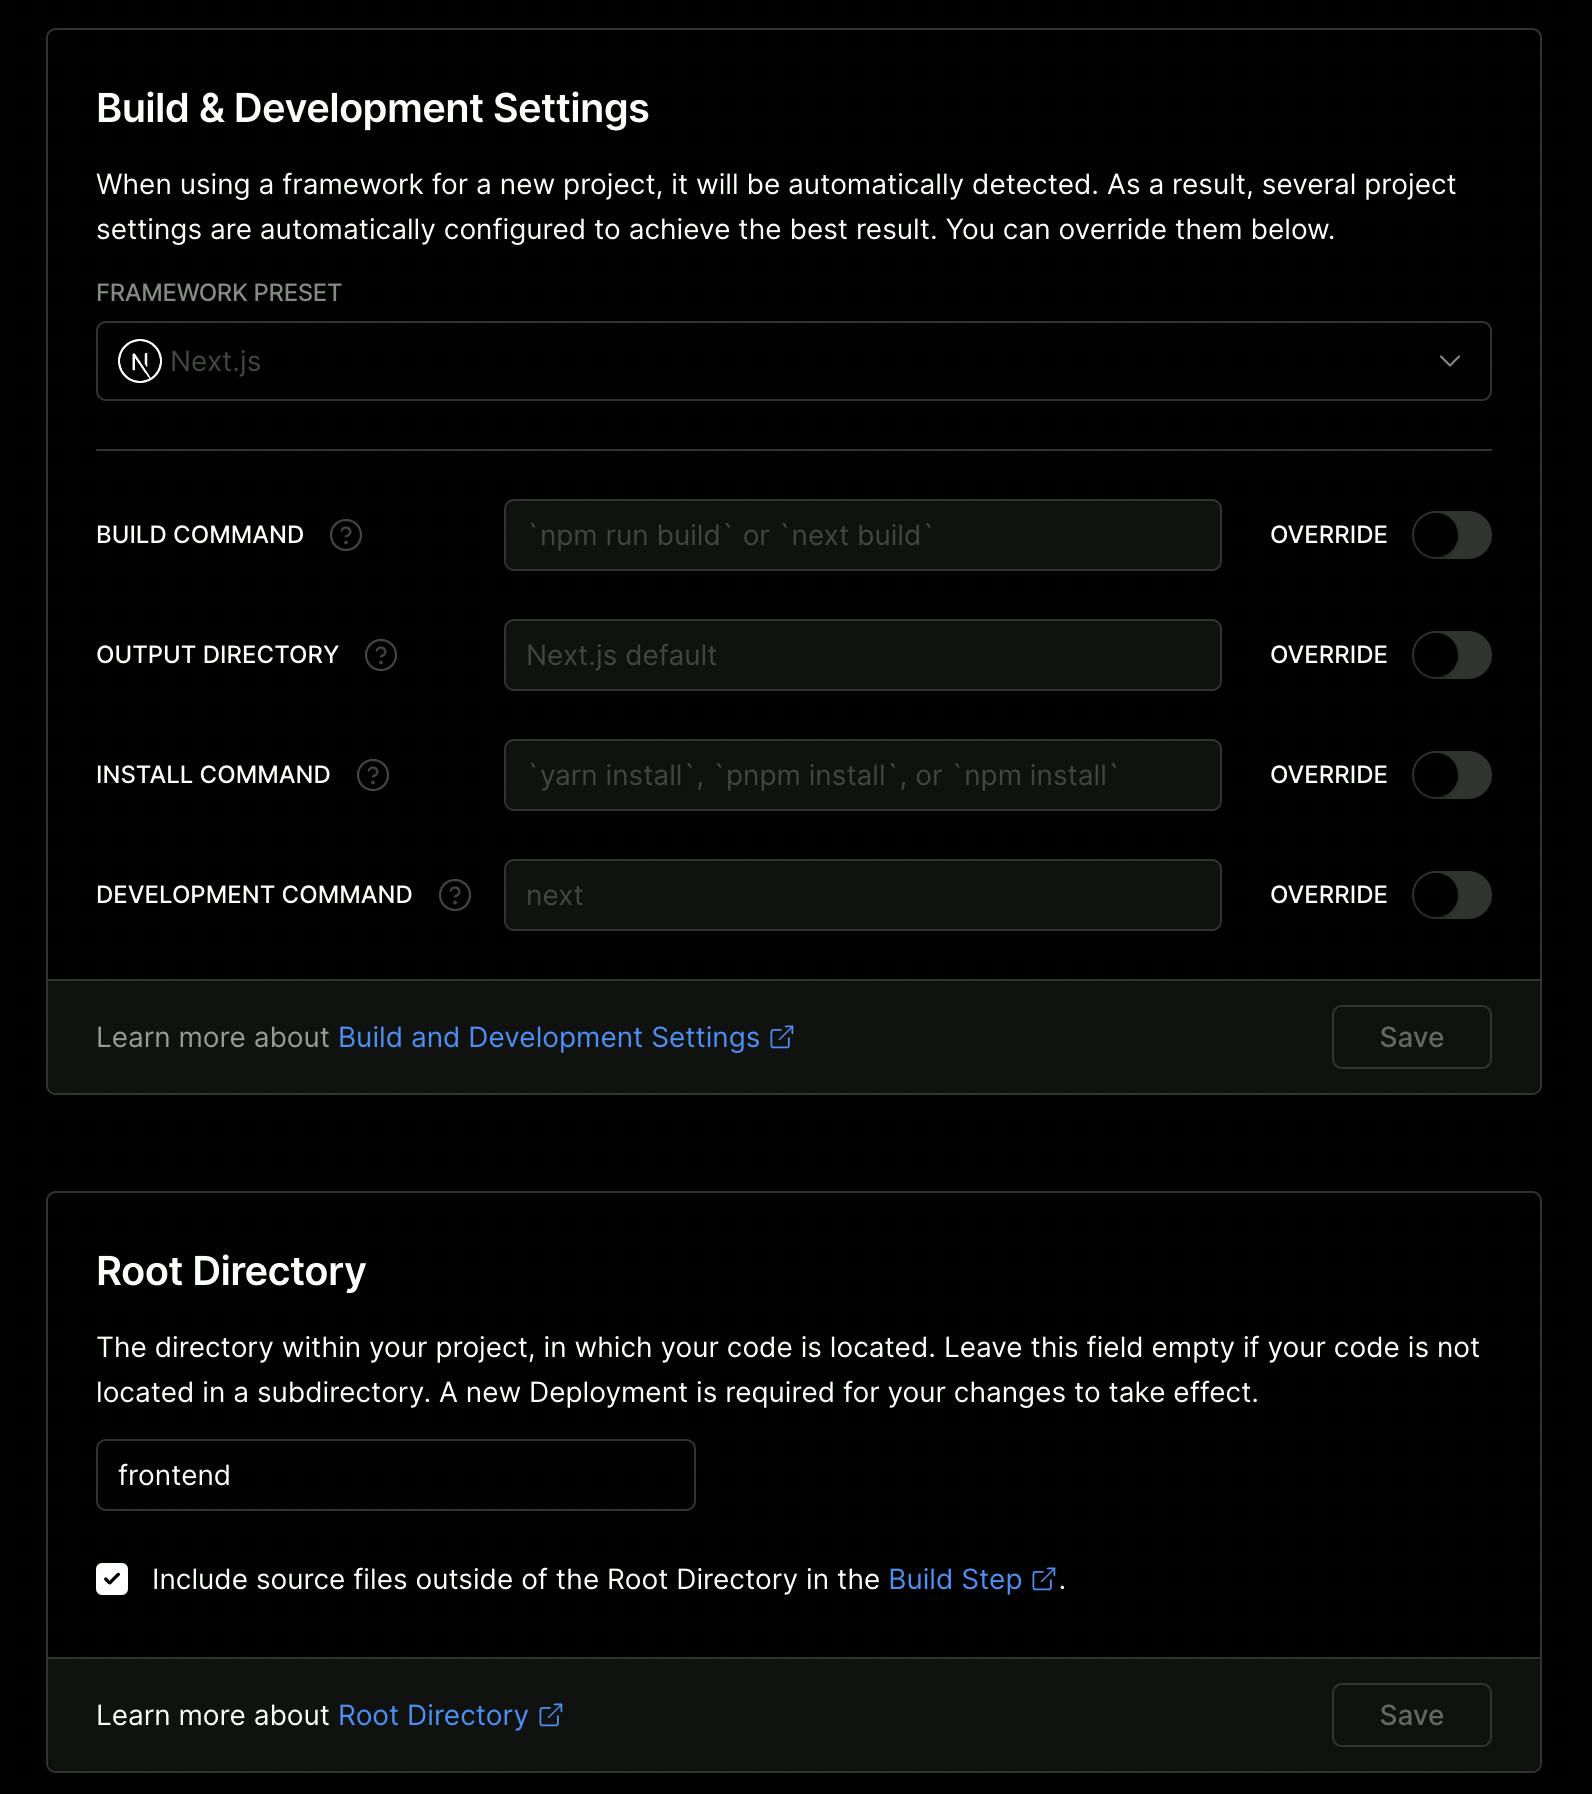
- Leave the rest of the settings as default and click Deploy. You should see the deployment process in progress.
- When deployment is done, click to open the deployed website. Copy and save the domain URL somewhere. You'll need it later.
Phase 5: Creating an API endpoint for the OpenSea NFT marketplace to query metadata
In order for the collection to be viewable on OpenSea, we have to create a metadata endpoint URL for OpenSea to fetch information about our NFTs.
How it works is that given a tokenId (think of it as a serial number for each of our NFT), this endpoint will return metadata for that specific NFT. Metadata of NFTs are usually structured as JSON, and in it contains the URL to the media file (jpg/png/gif/mp4/etc.) that's hosted online using IPFS or other services.
So let's create this endpoint. Start by navigating to your frontend/pages/api directory and then creating a new file called [tokenId].js. Make sure you add those square brackets in the file name since it allows you to perform Next.js dynamic routing.
Next, add the following code in that file:
export default function handler(req, res) {
  // get the tokenId from the query params
  const tokenId = req.query.tokenId;

  // As all the images are uploaded on github, we can extract the images from github directly.
  // Replace ---complete_images_directory--- with your github repo's directory that stores your NFT images
  // e.g. https://raw.githubusercontent.com/t3reetan/ionic-nft/main/frontend/public/ionic-nft/
  const image_url =
    "https://raw.githubusercontent.com/---complete_images_directory---/";

  // Using the tokenId that's passed from OpenSea, we construct the specific metadata endpoint URL
  // required to fetch information for that specific NFT.
  // To make our collection compatible with Opensea, we need to follow some Metadata standards
  // when sending back the response from the api.
  // More info can be found here: https://docs.opensea.io/docs/metadata-standards
  res.status(200).json({
    name: "Ionic Element #" + tokenId,
    description:
      "A 5x Unique Ionic Elemental NFTs collection. Only for the worthy.",
    image: image_url + tokenId + ".png",
  });
}
We now have an api endpoint that OpenSea can call (and pass in a specific tokenId) to query metadata of a specific NFT.
In order for our minted NFTs to have the metadata from our newly built api endpoint, we'll have to re-deploy a new Ionic NFT contract with this new api route as our METADATA_URL in the hardhat/constants/index.js file. In there, replace the nft-collection-sneh1999.vercel.app with the domain name you saved when deploying your website earlier. What we're doing here is replacing a dummy domain name (to help the code compile) with our own domain name that we got after deploying our website, which gives us access to our own api endpoint.
Once done, deploy a new contract by running:
npx hardhat run scripts/deploy.js --network rinkeby
Save this new NFT contract address down.
Navigate to frontend/constants/index.js and replace the old NFT contract address with the new one.
Push your updated code to Github. Vercel will automatically detect changes in your production branch (default to main) and deploy the new code for your website.
Phase 6: Minting an Ionic NFT
Once Vercel has successfully deployed your updated website, connect to your wallet that has access to the ETH account (with an ETH address) which is the owner of the NFT contract — basically the ETH address you used to deploy the contract. Only with that account will you be able to start the Presale of the Ionic NFT collection.
Start the presale, and thereafter, mint an NFT.
To see the Ionic NFT collection, go to testnets.opensea.io and paste your NFT contract address into the searchbar. There should be a suggest collection that pops up looking like this:

If you don't see it, don't panic. Give it 10mins. Go grab a drink and come back. When you just list your new NFT collection, it is normal to not have it show up straightaway. OpenSea says it takes around 7 days, but based on personal experience, it takes just 10 to 30 mins.
Alternatively, go to rinkeby.rarible.com and perform the same steps above. It takes a shorter time, probably around 5mins.
You could also paste in your ETH address and OpenSea or Rarible can show you the NFTs that you own.